How to Add an AI Chatbot to Shopify in 2026

Rajni
Last updated on August 27, 2026
Set up YourGPT on Shopify by training the agent, adding the widget script once, connecting Shopify, and creating product webhooks. Test existing products, one real catalog change, policy answers, performance, accessibility, and mobile placement before you publish the duplicate theme. Add Copilot for the real cart or AI Studio for protected order and return requests only after the basic setup works.
Shopify shoppers ask about products, delivery, returns, and orders while they browse. An AI chatbot can handle these requests from the storefront when each answer uses the right source.
This guide shows how to train YourGPT on current store information, add the widget to a Shopify theme, connect product data, and test the setup before publishing. It also covers optional cart, order, and return actions after the basic setup works.
Gather these items before changing the storefront:
Product pages must be public so YourGPT can read them. Duplicate the current theme and test it through Shopify’s Preview link.
Save a Lighthouse result for the duplicate theme before installing the widget. This gives you a performance baseline for the final check.
Shopify stores can use a standard theme, a Custom Liquid section, or a custom storefront. Choose the option that matches your store, and add the widget script in one place only.
| Installation path | Choose this when | What to know |
|---|---|---|
| Custom Liquid | Your theme lets you add a Custom Liquid section or block | The widget appears only on pages that use the section or template you edited |
theme.liquid | You want the widget on storefront pages that use the main Shopify theme layout | You need access to Online Store → Themes → ⋯ → Edit code |
| Headless shared layout | Your store uses Hydrogen or another custom frontend | A developer adds the script to the shared layout in the storefront codebase |
The script location controls where the chat widget appears. It does not connect store information by itself. Training supplies policy answers, while Shopify product synchronization supplies prices, variants, and stock.
You can complete the basic setup without a Shopify Admin API access token. AI Copilot Actions need Agent Mode for product and cart actions, but they do not need SHOPIFY_TOKEN.
You need SHOPIFY_TOKEN only when using the Shopify template in AI Studio for its Order Status and Return Order scenarios. After choosing an installation path, train the agent before adding the script to the duplicate theme.
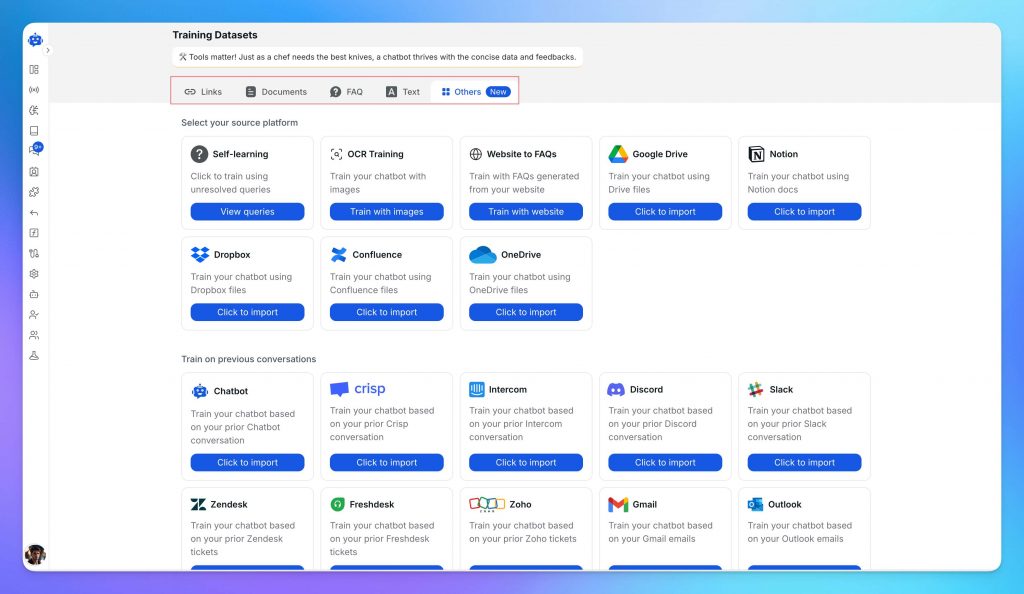
Create the agent in YourGPT. Describe what it should help with, state what it must not do, and add the store pages shoppers rely on.
Open Training in the YourGPT dashboard. Use Add New Link for one page, or open Training → Crawl, enter the store URL, and select Extract when you want to collect several pages.
Add these sources first:
The website and link training guide explains the source options. Start with pages that affect a purchase or support request.
Do not crawl the whole blog by default. An old campaign page may conflict with the current shipping or return policy.
Wait until each source finishes processing. When a policy changes later, update or refresh that source instead of assuming product webhooks will change written policy content.
Open Settings → Widget. The page is labeled Customise your widget.
Use real questions about shipping, return eligibility, or product fit. Reuse these questions during testing.
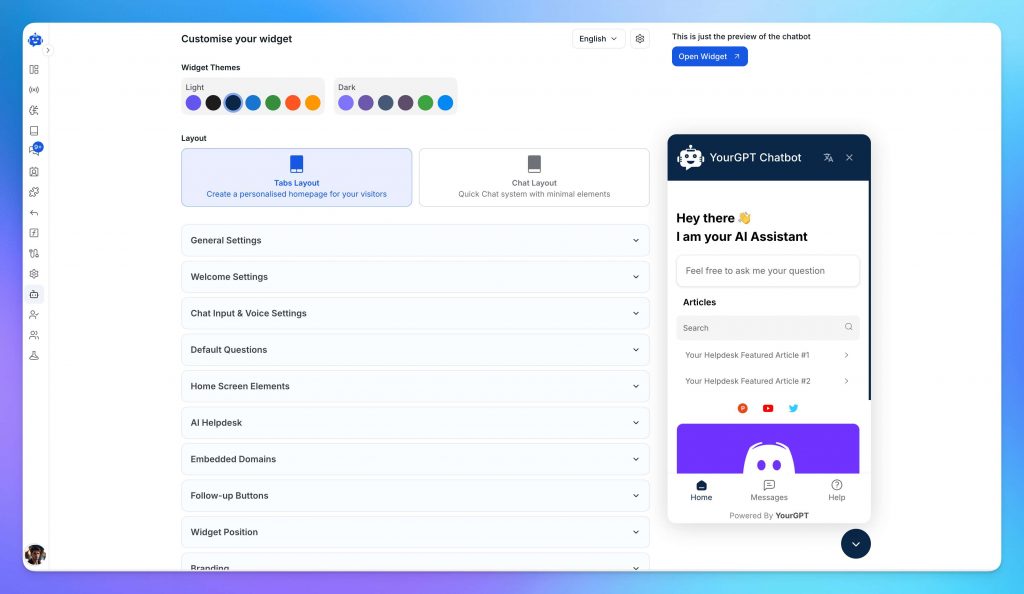
The agent now has its store sources and greeting. Next, add the script to the duplicate theme once.
Open Integration in YourGPT, search for shopify, click connect and copy the widget script. Choose Custom Liquid or theme.liquid, not both. Installing the script twice can create two chat bubbles.

Custom Liquid avoids opening theme files, but its section placement still controls where the widget loads.
If the script contains {{ or {%, wrap it in {% raw %} and {% endraw %} so Shopify does not interpret the snippet as Liquid.
Open the duplicate theme’s Preview link. Check the home page, a product page, and the cart on desktop and mobile.
Use theme.liquid when Custom Liquid is unavailable or when the widget must appear on every layout that uses the main theme file.
</body>.
The YourGPT Shopify installation guide shows this path. If Edit code is missing, use Custom Liquid or ask a staff member with the required theme permission.


If the bubble does not appear, confirm that you opened the duplicate theme’s Preview rather than the live storefront. Also confirm that the script sits inside theme.liquid and above </body>.
Hydrogen and other headless storefronts do not use theme.liquid. Add the same widget script to the shared layout that wraps the storefront pages, then continue with the Shopify connection and product synchronization.
The theme-installed widget does not carry into Shopify checkout. It can send a shopper to checkout, but the chat itself does not continue on the checkout page.
The bubble now appears in the duplicate theme’s Preview. Connect Shopify next so the agent can use current product data.
Open the Shopify integration in YourGPT, enter the store URL, and complete the connection steps. Separately open the duplicate theme’s Preview and confirm that the widget appears before publishing.
First, check several products that existed before you created the webhooks. Choose products from different collections. Include variants and different stock states when possible.
Ask for each product’s price, variants, and stock status. Compare each answer with Shopify before you test a product update.
If existing products are missing, check the Products tab and synchronization status before continuing. A new webhook reports new events. It does not prove that older products are available.
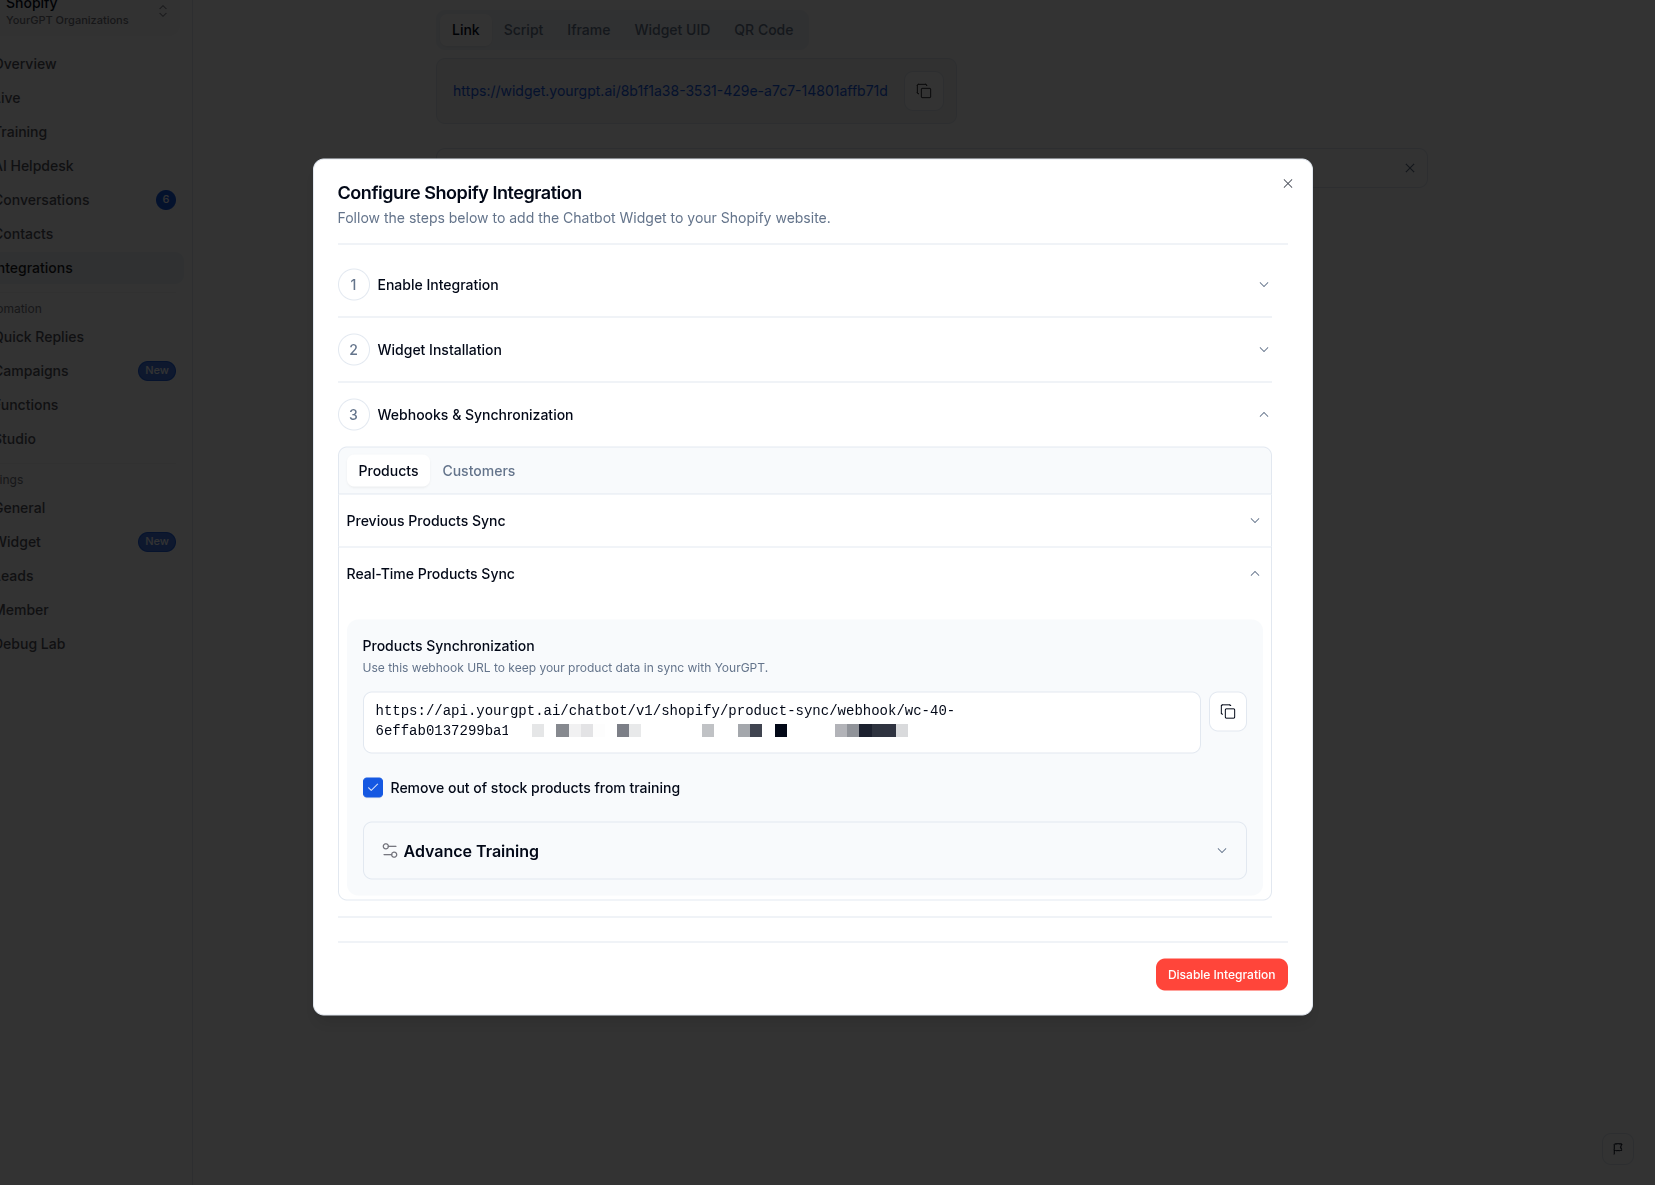
In YourGPT, open Webhooks & Synchronization → Products → Real-time Sync and copy the Products webhook URL. In Shopify, open Settings → Notifications → Webhooks and create these JSON webhooks:
| Shopify event | Destination URL | Required for base setup |
|---|---|---|
| Product creation | Products webhook URL | Yes |
| Product update | Products webhook URL | Yes |
| Customer creation | Customers webhook URL | No |
| Customer update | Customers webhook URL | No |
For each product webhook:
Send test confirms that Shopify attempted to deliver the webhook. Change a real product in Shopify and check its answer in YourGPT to confirm that the update was processed.
Product creation adds new catalog items. Product update carries changes such as price, variants, and stock. The real-time synchronization guide shows the matching Products and Customers tabs.
On the Products tab, turn on Remove out of stock products from training if the agent should not recommend sold-out products. Open Advance Training to check re-index timing.
Keep the webhook URL private. Anyone with the URL could send data to the endpoint.
If existing products are still missing, stop the launch. Check synchronization status on the Products tab, then contact YourGPT support with the store domain and redacted webhook details.
Customer synchronization is optional. Use it only when YourGPT needs the customer’s name, email, or phone number.
In YourGPT, open Webhooks & Synchronization → Customers → Real-time Sync and copy the Customers webhook URL. In Shopify, create Customer creation and Customer update JSON webhooks with that URL.
Use a staff test customer to change one contact field, then confirm the change in YourGPT. Customer synchronization does not import addresses or order history. Order Status and Return Order use the Shopify template in AI Studio instead.
For product and policy answers, product webhooks are enough. You can now test the basic setup with real support tickets.
Test the basic setup before enabling shopping actions. This makes training, theme, and synchronization problems easier to isolate.
Pull recent support emails, chat transcripts, or support tickets. Give a teammate those exact messages, plus a live product URL and the policy URLs used in Training. If Default Questions reflect real demand, test those too.
Check every answer against the page or Shopify record that contains the information:
A response fails when it sounds plausible but cannot be traced to the store. The guide to why AI agents give wrong answers explains how missing or conflicting sources create these failures.
Start with the part that produced the wrong answer. For a source problem, open Debug Lab → Training Audit, then use Find Document to locate the source.
For a storefront conversation, open the conversation and select View Logs in its right panel. For an AI Studio scenario, open the Logs drawer at the bottom right and use Variable Logs in the Emulator.
The logs show whether the problem came from a source, conversation settings, or AI Studio logic. Fix that problem before changing prompts.
Open the duplicated theme’s Preview on desktop and mobile. Check home, product, collection, and cart pages.
Run the same Lighthouse test again on the duplicate theme before publishing. Use the same page, browser profile, device, and network settings as the baseline.
After launch, check Shopify’s Web Performance report for changes seen by real visitors.
Test the widget with a keyboard:
On mobile, verify that the launcher and open panel do not cover Add to Cart, cookie controls, accessibility tools, or fixed navigation. Use a private window to check whether browser cache or an earlier chat session caused the problem.
If the bubble is missing, make sure you opened Preview rather than the live store. Then check that the current template includes the Custom Liquid section or that the headless layout loads the script. If two bubbles appear, remove one installation.
Change the price or stock of a real product, then ask the agent about it. If the old value remains, inspect the Product update webhook and the conversation’s View Logs.
Seeing the widget is not enough. The setup passes only when product and policy answers match the live store. Publish only the duplicate theme that passed these checks.
Preview proves that the duplicate works. It does not make that theme visible to shoppers.
If the public storefront fails a check, return to Online Store → Themes → Draft themes and publish the previous theme again. Repeat the public checks after the rollback. Keep the previous theme until your team has finished monitoring the replacement.
The basic storefront setup is now live. Before adding more features, decide where each type of shopper request gets its information.
Use the source that contains the requested information. Policies come from Training, stock comes from Shopify, and order details come from an authenticated Admin API request.
| Shopper asks about | Source of truth | Keep it accurate by |
|---|---|---|
| Shipping and return policy questions | YourGPT Training | Refreshing the source when the written policy changes |
| Price, variants, or stock | Shopify product catalog | Keeping product creation and update webhooks active |
| Product search and cart | Shopify catalog and cart state | Testing Copilot with real products, variants, and cart changes |
| Order status or customer-specific return actions | Shopify Admin API | Securing the Shopify token, verifying the shopper, and limiting Shopify permissions |
The AI agent for Shopify guide explains how these sources support storefront requests.
You can stop here if the agent only needs to answer product and policy questions. The Smart Chatbot for Shopify guide covers broader storefront support scenarios. Add Copilot for cart actions or AI Studio for protected order data.
AI Copilot Actions add product cards and cart actions without AI Studio. They require Agent Mode and a connected Shopify store.
Open Settings, scroll to Mode at the bottom of the page, and switch from Chat Mode to Agent Mode. The Chat Mode and Agent Mode guide explains the behavioral difference.
Next, open Functions → AI Copilot Actions → Shopify and enable the Shopify actions. The Copilot Actions guide documents five connected actions:
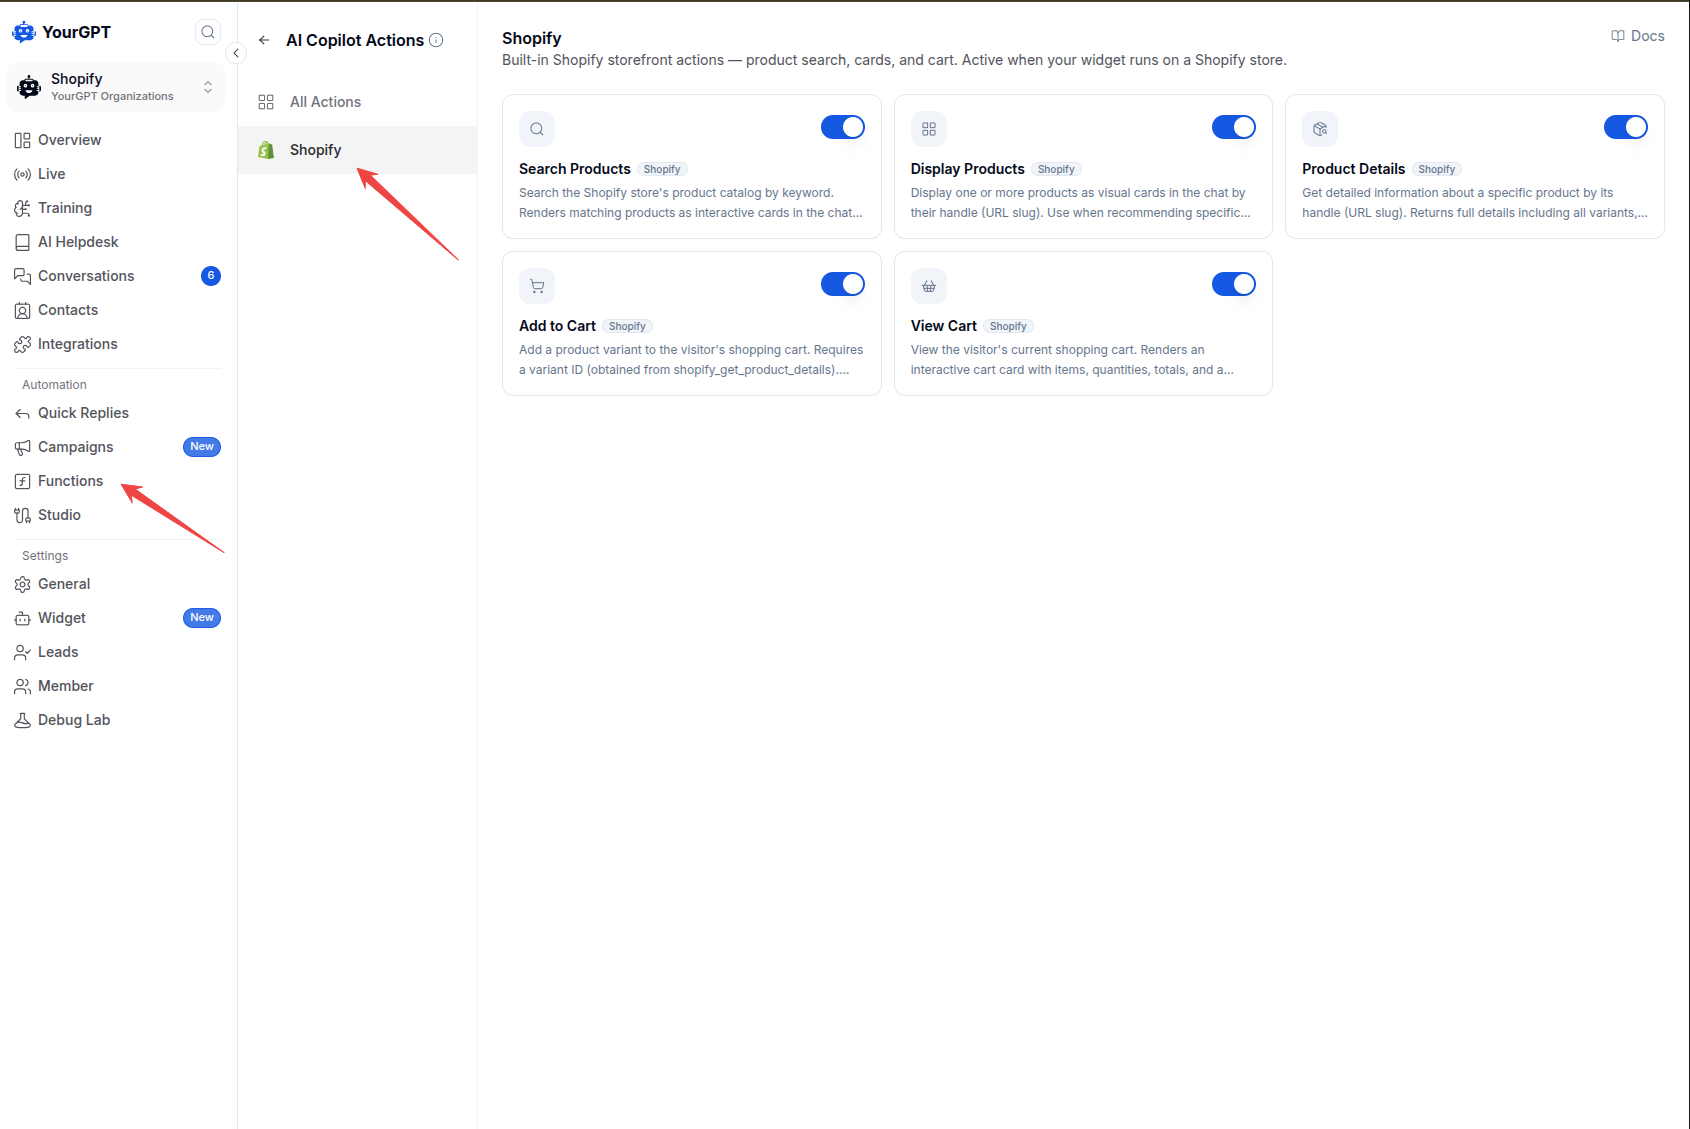
Typed add-to-cart requests ask for confirmation first. Selecting Add on a product card adds the item immediately, and an out-of-stock product cannot be added.
All five actions currently turn on together. Test the complete sequence with a real in-stock product that has multiple variants. Confirm that the selected variant reaches the shopper’s real Shopify cart and that quantity changes match the store cart.
The Checkout button opens Shopify checkout, where the theme widget no longer runs. Copilot handles product discovery and cart actions. Use AI Studio for protected order and return requests.
Use the Shopify template in AI Studio only when you need Order Status or Return Order. This setup is separate from Training, product webhooks, and Copilot.
Shopify issues the Admin API access token when you create a compatible custom app. Store it as SHOPIFY_TOKEN. Store the shop host, such as your-store.myshopify.com, as SHOPIFY_ENDPOINT.
These variables support the template’s Order Status and Return Order scenarios. Grant only the Shopify permissions those scenarios use, and return only the fields needed for the request.
Keep SHOPIFY_TOKEN out of theme code, browser code, screenshots, chats, and support tickets. If a supported token is unavailable, do not return order data. Send the request to a person instead.
In AI Studio, open the Connect Your Shopify Store with an AI Chatbot template, then:
SHOPIFY_TOKEN and SHOPIFY_ENDPOINT as config variables.The template includes Search Product, Product Details, Add to Cart links, View Cart links, Order Status, and Return Order. For a worked example, see how a Shopify agent answers product questions and retrieves order status.
Review each imported scenario because its permissions may differ. AI Studio returns cart links, while Copilot changes the shopper’s real cart inside the widget.
An order number or email address entered in chat is not enough to authorize access. A developer must verify the signed-in Shopify customer on a trusted backend and pass the verified identifier to YourGPT.
YourGPT identity verification signs an external user ID, email, or phone number with the widget Secret Key. Generate the signature on the server and pass it as user_hash with the contact data.
HMAC confirms that your backend signed the identifier. It does not authenticate the Shopify Admin API request or prove that an order belongs to that shopper. Restrict the order lookup to the same verified customer.
If identity verification fails, return no order or customer data. Use Escalate to Human instead.
Open Emulator in AI Studio. Use an authorized test order and a product that exists in the catalog.
Confirm that:
Open the Logs drawer at the bottom right to inspect API calls, responses, and node execution. Use Variable Logs in the Emulator to inspect stored identifiers and values. Select Publish only after both checks pass.
In AI Studio, add Escalate to Human for requests that need judgment or account access. Assign Member routes the conversation to a teammate but does not pause the agent. Use Escalate to Human when a person should take control.
Send the request to a person when it moves money, exposes protected data, or needs a decision the store has not approved. The customer support automation guide explains where automation should stop.
Before publishing, confirm that the Shopify token works, the test shopper sees only their own order, failed verification sends the chat to a person, and the Emulator tests pass.
No, once a shopper reaches checkout, your YourGPT widget won’t follow them there. It can still send someone to checkout, but the chat itself stops running once they’re on that page.
No. Product webhooks only update catalog info like prices and stock. If you turn on customer sync separately, you’ll get name, email, and phone, but never order history or addresses. For order lookups, you’ll need the Shopify template in AI Studio, which requires Admin API access and shopper verification.
Not for the basics. You can skip it for Training, installing the widget, syncing products, or using AI Copilot Actions. You’ll only need it if you’re using the Shopify template in AI Studio for Order Status or Return Order.
Yes. You just won’t use theme.liquid. Instead, add the widget script to your shared storefront layout, then connect Shopify and set up the same product webhooks.
No, not for product changes. Your product webhooks handle that automatically. You’ll only need to refresh training when the wording of a policy page itself changes.
Run a Lighthouse test before you install the script, then run it again before you publish. Compare the two, and check Shopify’s Web Performance report after launch. If you notice a slowdown, check for a duplicate widget script first.
You’ll need to reinstall the script, since it lives in the specific theme, not your store overall. After you publish a new theme or run a major theme update, check that the script appears once and retest your product, cart, mobile, performance, and keyboard checks.
Adding YourGPT to Shopify has three main steps: train the agent on current store information, add the widget to the theme once, and connect Shopify product data.
Start with one current policy page, one live product, and one real support ticket. Test those sources on a duplicate theme before you publish it. This gives you a small setup that is easy to check and fix.
After launch, keep product webhooks active and refresh policy sources when the store changes them. If you add cart, order, or return actions, test them separately. Do not show order data when the shopper cannot be verified; send the request to a person instead.
Create the agent, add your store pages to Training, paste the widget into your theme, and connect product sync.
Group new-account tickets by onboarding stage, train an AI agent on your docs, and place it in the product where new users get stuck.

AI agents can now find and buy products for shoppers. See what agentic commerce changes for a Shopify store and which support jobs stay yours.
Build a Halloween shopping assistant for Shopify with YourGPT. Set up product recommendations, stock checks, cart actions and human support before launch.

See what a good customer effort score looks like, how to word and calculate CES on each scale, and which support habits raise customer effort.
Tier 1 support handles first contact. See how Tiers 0 to 3 differ and what changes when an AI agent becomes your first line.
The 12 customer service metrics to track when an AI agent resolves tickets, with a formula for each and a baseline built from your own last month.