How to Automate Asana Tasks with YourGPT x ViaSocket

Rajni
Last updated on May 18, 2026
YourGPT and Asana work best together when conversations can turn into structured tasks without manual handoff between support, ops, or project teams.
You can connect them through Asana MCP, YourGPT AI Studio, or viaSocket, depending on whether you need agentic control, custom workflow logic, or a fast no-code setup.
Start simple: use one clear trigger, create tasks in one Asana project, include useful context in the notes, and send the task URL back to the original YourGPT session.
Your team collects requests in YourGPT.
Your team executes in Asana.
Between them, someone still has to turn the request into a task Asana can use: name it, route it, add the context, and check what might have been missed.
That is not a process issue. It is a missing connection.
YourGPT can turn the request into an Asana task automatically. The task can have a clear title, useful notes, the right project, and the context your team needs before work starts.
In this blog, we will build that connection between Asana and YourGPT. We will covers how to set that up, workflows to build, and best pratices.
Before walking through the setup, it’s worth knowing what your options actually are. There are three ways to connect YourGPT to Asana, and they’re not interchangeable.
1. Asana MCP (Model Context Protocol)
MCP gives YourGPT’s AI agent direct, contextual access to Asana. Instead of a fixed trigger-action chain, the agent can read task context, create tasks, update them, and reason about what action to take all in a single conversation turn. This is the most capable approach, but it requires your team to be comfortable configuring MCP servers and thinking in terms of agent actions rather than linear workflows.
Best suited for teams already running YourGPT in an agentic setup who want Asana to be part of what the agent can do, not just a downstream destination.
2. YourGPT AI Studio
AI Studio lets you build custom workflows visually inside YourGPT, with logic, conditions, and branching built in. You define what happens when specific events occur no external automation platform needed. More flexible than a simple connector, more accessible than MCP configuration.
Best suited for teams that want tighter control over workflow logic and prefer to build inside YourGPT rather than across tools.
3. viaSocket (no-code connector)
viaSocket is a third-party automation platform that connects YourGPT and Asana through pre-built triggers and actions. You select a trigger, select an action, map the fields, and go live. No code, no agent configuration. Setup takes under 10 minutes.
Best suited for teams that want something running fast, without deep configuration, and are comfortable with a trigger-action model.
Connecting YourGPT and Asana makes it easier to move work between conversation and execution.
On the YourGPT side, messages, requests, and session activity can trigger actions. Updates can also be sent back into the same conversation.
On the Asana side, tasks, comments, completions, and project activity can trigger actions. Tasks can also be created and updated as part of the setup.
That gives teams two useful directions to work with. A request can start in YourGPT and become a structured task in Asana. Progress in Asana can also be sent back into YourGPT so the requester stays informed.
With that in place, the next step is deciding which use cases are worth building first.
Here are seven practical workflows to start with.
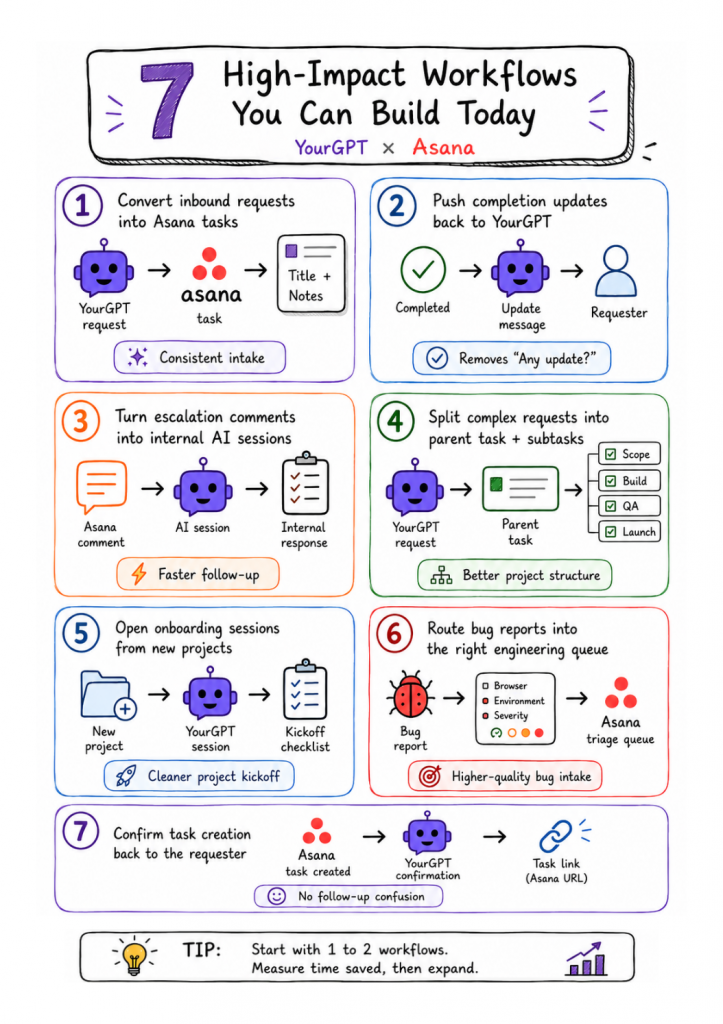
If you are deciding which one to build first, use three filters:
Avoid workflows that need title parsing, multi-project routing, or approval logic on day one.
The screenshots below show the simplest visible flow:
It is the fastest way to prove the wiring works because you can watch a message become a task immediately.
For most production teams, User Message Sent is usually the safer default because it keeps intake tied to user-originated requests. The screenshots use Message Received, so the walkthrough below follows that exact UI.
In viaSocket, create a new flow. When the builder asks how the automation should start, select YourGPT.
From the available triggers, choose Message Received.
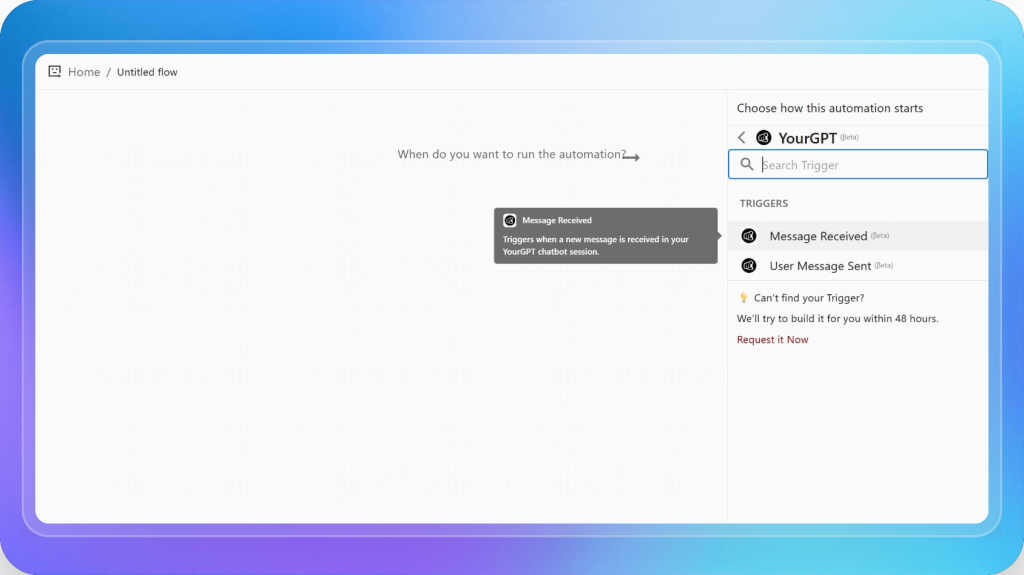
This trigger is the right choice when you want a new incoming message in a YourGPT session to create work in Asana automatically.
One important distinction: Message Received and User Message Sent are not the same thing. Use User Message Sent when you only want user-originated intake to create tasks. Use Message Received when the broader incoming session event is the right trigger. If you choose too broad a trigger, you can end up creating tasks from assistant replies or system-driven messages.
After selecting Message Received, viaSocket shows a Webhook URL. Copy that URL.
Then in YourGPT, go to:
YourGPT -> Chatbot (Access Now) -> Select Your Chatbot -> Integrations -> Development -> Webhook Integrations (Manage) -> New Webhook
Paste the webhook URL, choose the message event, then save the webhook.
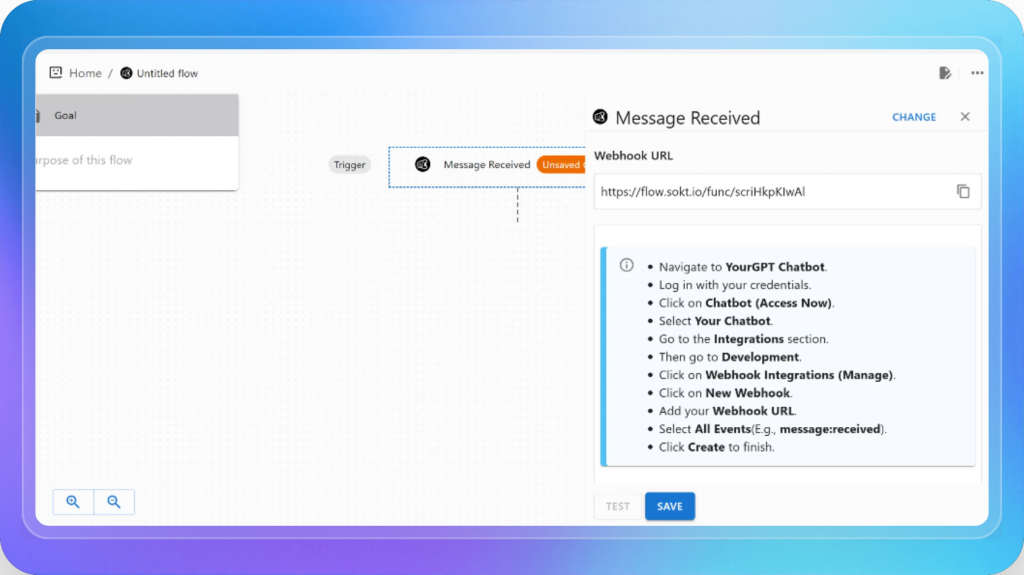
Without this webhook, the flow never starts.
Keep the webhook scope narrow. If YourGPT lets you choose a specific message event, use that instead of subscribing broadly. The broader the event scope, the noisier your testing becomes.
Once the trigger is ready, click Add Step in viaSocket and choose Asana.
Then select Create Task or Subtask from the Asana action list.

For a first rollout, use task creation. It is simpler to validate than updates, subtasks, or routing logic.
In the Asana action panel, configure:
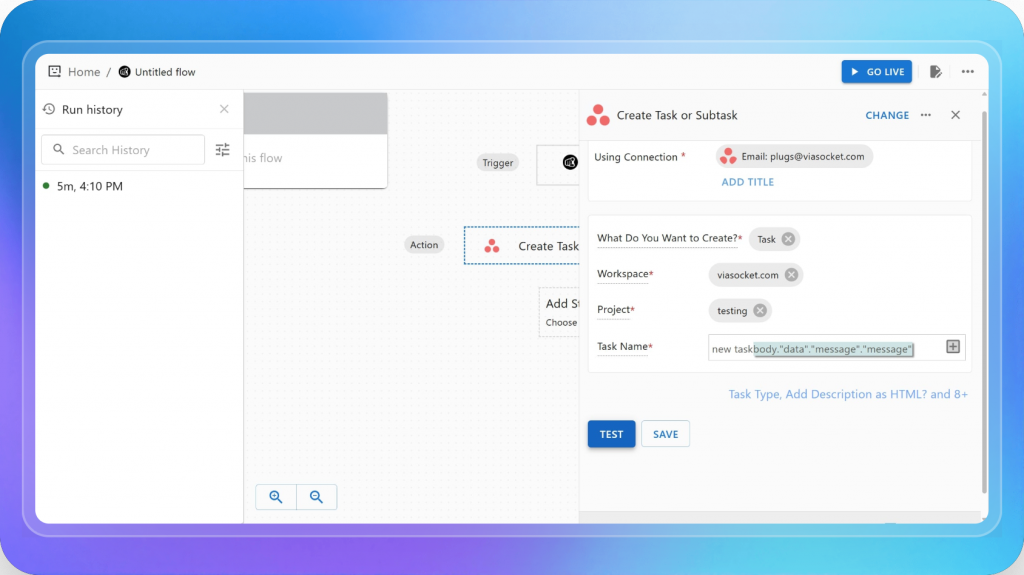
The default maps the full message text into the task name. That confirms the connection is working. Don’t ship it that way.
Asana task names are scanned in queues. Long conversational strings make lists unworkable. Here’s a schema that holds up in production:
| Field | What goes here |
|---|---|
| Task Name | Verb + object + account. Example: Update billing contact for ACME |
| Notes / Description | Full message, deadline, requester identity, session ID, and account context |
| Project | Fixed at first. Dynamic after the first setup is stable |
| Section | New Requests. Add routing logic later |
| Tag | from-yourgpt so automated tasks are easy to filter |
| Assignee | Only if there is already a stable routing rule in place |
The notes field is where the executor works. The title is how they triage. Both need to be useful independently.
Click TEST. If the mapping is correct, viaSocket creates a real task in Asana and returns:
success: truetask_gidtask_nametask_url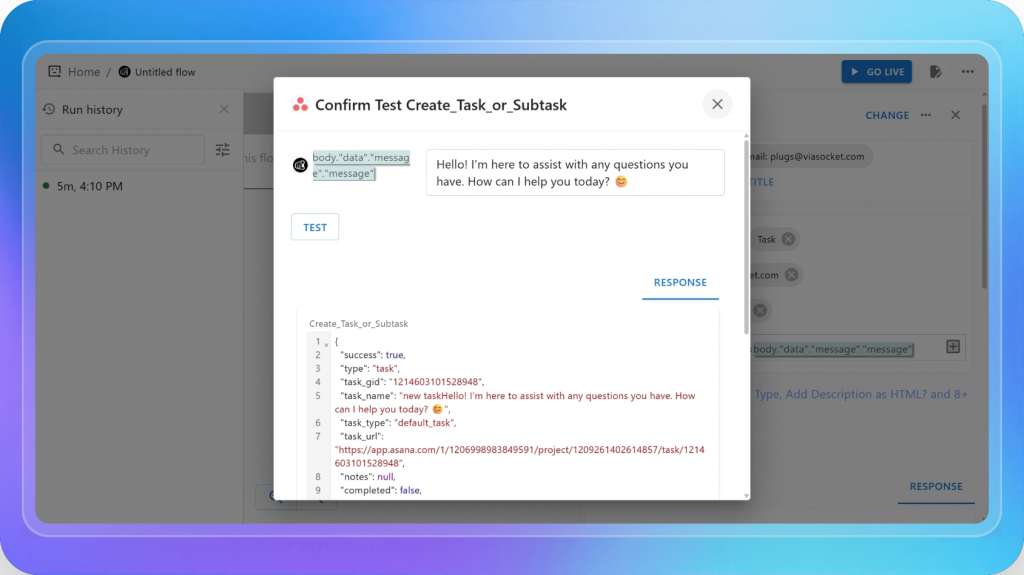
Don’t stop at success: true. Open the actual task in Asana and look at it like someone who has to work it. Is the title readable in a queue? Are the notes actionable? Did it land in the right project and section?
The test confirms the API call succeeded. The task inspection tells you whether the automation is producing useful work.
After the test passes: SAVE → review fields one more time → GO LIVE.
Two decisions that matter more than the clicks:
These are the things that separate an automation your team trusts from one they quietly route around after the second week.
from-yourgpt from day one and include the session ID in the notes. When something looks off, a duplicate, a misfiled task, a missing field, you can filter and audit in seconds instead of digging through the entire backlog.Yes. YourGPT can create tasks in Asana from incoming requests, and Asana can send updates back into YourGPT sessions when task status changes. Keep these as two separate automations. That makes testing easier, reduces feedback loop risk, and gives you clearer control over what each side does.
Message Received fires on any incoming message inside a YourGPT session. That can include assistant replies or system-driven events, depending on the setup. User Message Sent fires only when the user submits a message. For task creation, User Message Sent is usually the better trigger because it keeps task creation tied to actual user requests.
Start simple. Include the session ID in task notes from the first version and tag all automated tasks. It also helps to send new tasks into a dedicated triage section first. That makes duplicates easier to spot before they spread into the main backlog.
It depends on what you need most. viaSocket is a fast way to launch a working integration with minimal setup. Asana MCP is also a fast and powerful option when you want the AI agent to work with Asana more directly. AI Studio is the better choice when you want more control over logic, conditions, and behavior inside YourGPT. If speed is the priority, viaSocket and Asana MCP are both strong starting points. If control is the priority, use AI Studio.
Most teams do not lose time because their process is broken. They lose time in the handoff between conversation and execution.
YourGPT collects the request. Asana manages the work. But if someone still has to turn every message into a task manually, the system still depends on a human bridge.
This integration removes that bridge.
Start with one simple workflow: a user message creates a structured Asana task, and the task URL is sent back into the same session. Requests stop getting lost, task details become more consistent, and requesters know their work has been logged.
Do not automate everything on day one. Pick one trigger, one Asana project, one task format, and one confirmation step. Run it for a week, review the output, and improve the flow before adding more layers.
The best automation setups start small. Remove one repetitive handoff, make it reliable, and let the next workflow become obvious.
Connect YourGPT with Asana to turn conversations into structured tasks, reduce manual handoffs, and keep teams aligned from request to execution.
AI-first workflow automation • Built for support, operations, and project teams

TL;DR A Messenger AI agent helps businesses respond to Facebook Page DMs faster, answer customer questions using business data, and guide visitors toward the next step. With YourGPT AI for Messenger, businesses can enable 24/7 auto-replies, rich messages, multilingual support, human handoff, an omnichannel inbox, and no-code workflow automation. Facebook Page DMs are often where […]
Proactive AI is not a new category. It is just a shift in how you use the systems you already have. Instead of waiting for a customer to ask for help, you step in earlier, when the signal is there, but the request has not happened yet. Most teams are still reacting. A ticket comes […]
AI agents form the backbone of modern intelligent systems. They give machines the ability to sense what is happening around them, make decisions, and act independently without needing a human to guide every step. From chatbots that resolve customer issues instantly to self-driving cars navigating complex city streets in real time, AI agents power the […]
TL;DR An AI agent for gyms helps fitness businesses capture website leads, answer routine member questions, support trial bookings, guide class enquiries, and hand complex conversations to staff with context. The best setup uses approved business knowledge, clear escalation rules, CRM or workflow connections, and safe human handoff so gyms can reduce missed enquiries, improve […]
TL;DR Building a WooCommerce AI chatbot takes about 10 minutes and requires no coding. With YourGPT, you can train the chatbot on your store data, connect WooCommerce using REST API and webhooks, answer product and order questions, capture leads, support cart recovery, and extend the same AI assistant across your website, WhatsApp, Instagram, and other […]
TL;DR AI agents are becoming part of everyday business operations across customer support, sales, onboarding, and internal workflows. In customer support, they are commonly used to answer questions, automate billing support, track orders, handle repetitive requests, collect information, route conversations, and assist human agents with context and actions. Some platforms focus mainly on conversational replies, […]